Monday 19 December 2011

translucent collage tutorial

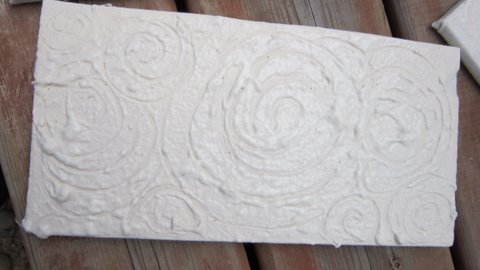
I worked with my class this week to make
translucent sandwiches with bits of yarn, fabric, 
thread and ribbon between waxed paper and 
kleenex.
The results were fun and now comes the 
chance to cut them up for use in cards, 
mixed media work and collage. 
Fringe coloured magazine sheets to make fun confetti.
Sprinkle these over a sheet of waxed paper. Add fabric and other tidbits.
Next place a one ply layer of kleenex over the cut up bits on waxed paper.

Gently cover whole collage with mix of 1/2 water and 1/2 white glue.
Let dry then display!

Thursday 8 December 2011

knit bombing

I never really 'got' the idea of knitting bombing until
I saw this bicycle at our art gallery.  Wow, is that cool!
Makes me want to do some knit bombing on something
at home.... maybe.....my aerial and car door handles!

Yarnbombing, yarnstorming, guerrilla knitting, or graffiti knitting 
is a type of graffiti or street art that employs colorful displays of knitted 
or crocheted cloth rather than paint or chalk. (Wikipedia)

Friday 2 December 2011

tiny snowmen

In the midst of fall festivities there is always at least one Christmas
bazaar and this was my contribution to the local long term care
facility.  These tiny snowmen are less than three inches tall.  They each
have their own knitted hat and are made from cut up tree branches.
Lots of fun to make.


Saturday 26 November 2011

paint as one

In groups of four my students painted together....
the idea was to paint as if one person was doing
all the painting.  Can you see the dividing lines?
There was lots of challenging going on in the
groups. Different brushstrokes, hues, blends and
second layers of colours added.


No one was allowed to cross the paint line and work in their
neighbour's sections.... they had to work together to "paint as one"

Friday 4 November 2011

pounding out beautiful prints!

This is the easiest transfer of all and you can take out your frustrations
while doing it!  All it took was a beautiful coloured oak leaf, a
piece of muslin and a hammer.  I laid the leaf on the fabric and
hammered the leaf until the colour transferred to the fabric.
Ironing on the wrong side will then heat set the print.  Wow...
so many possibilities with this process!


Hapa-zome is literally “leaf-dye” in Japanese, according to India Flint, 
author of Eco Colour: Botanical Dyes for Beautiful Textiles.

Tuesday 1 November 2011

Artist trading card stamp

Friends of mine were searching for a stamp for
the back of their ATC cards and had trouble
locating one.  I liked the idea so decided to make
one.  The instructions are as follows......

First trace a trading card and print name
and address in big letters (so they can be carved
out of lino) Reverse the design so it will work
as a stamp. 
Copy this onto a piece of lino and carve it with a lino cutter.
Use a small stamp pad to ink up the carved stamp.
Stamp the back of your Artist Trading Card and fill in your name and date.

Tuesday 25 October 2011

flip flop printing

We had a good time at the recent flip flop print workshop at the conference.
First we used pieces of cut up flip flops for a variety of printed ATC cards.
Later we heated the foam and impressed our own designs but I will share this
process in another post.  Here are the results of the flip flop sole prints......


Thursday 13 October 2011

pumpkin lids

I have been fun knitting some little pumpkin lids for
the new additions to the patch!

Friday 7 October 2011

fall prints

piles of leaves and little people... lots of fun in the fall!

Monday 19 September 2011

tatting

We had a long journey across country this month and with GPS there is
not much need for my services as navigator!  That left me lots of time
to do some tatting... little flowers were easy and work into nice
greeting cards.  A bit of watercolour added and they are ready!


Wednesday 14 September 2011

Freshstart conference

I'm presenting at FreshSTART for the Ontario Art Educators Association on
October 15.  The group has undergone lots of changes and I am excited to
be part of the new roll out this fall.  My workshop FLIP FLOP printing will
involve using all kinds of easily accessible foam and rubber objects to create
moldable stamps.
If you're an Ontario Teacher why not join us??!!
It promises to be a fun and informative day!

http://www.osea.on.ca/home.html

Friday 9 September 2011

over 1000

Whooee, I just made 1000 hits this week.  It has been a new adventure for me
doing the blog but since my article in Quilting Arts went up I have enjoyed
posting art as I go.  I have lots to share from our trip west to Vancouver Island!

Friday 2 September 2011

eraser carving

It is always lovely to come back to carving and printing
after being immersed in other projects for a while.


Wednesday 24 August 2011

tiny 3d house

I recently made a 3d house from a net pattern in Cloth Paper Scissors
magazine.  The "coffee" house is made completely from recycled coffee
carry out materials..... stir sticks, cups, plastic lids and coffee beans!


Saturday 20 August 2011

paste resist tutorial

OK, so we're in the midst of finishing our cabin and have all these little  pieces of wood laying around just begging me to do some artwork.  (Yes, stuff in my environment talks to me about possibilities!)  I wrapped them in muslin and was ready for paste resist fun!


Start by wrapping some wood with muslin. Pull tight and hold in place with a few staples on the back. 
Mix flour and water... the mixture is up to you but it should be spreadable with a brush. This isn't gravy so lumps are OK!


Spread flour paste liberally over muslin board. I used a foam brush. Leave it to dry thoroughly.  


And now the fun part!  When the flour is completely dry, remove the muslin from the board and crumple! Make sure you crumple the whole piece of fabric as the crinkle lines are where the paint will seep through and make the design! Next, spread out your muslin and cover completely with acrylic paint of your choice. The craft types in small bottles are a good consistency.  Now, leave this to dry completely again! 


When the paint is completely dry you can crumple your work and put it in a bucket of water to soak for a few minutes. This will loosen the paint and flour which then can be scraped off with a knife or flat blade of some sort. As you scrape the crackle design will appear. Oooooh  that is fun to reveal! 
Here is one I did with black paint!
And here is one I scratched with circles in the wet paste before drying.  The crackling was added after it dried! 


Questions.... ideas?  I would love to hear from you  and share ideas. I respond to all comments.

If you would like to link or share with someone else please credit my site and send me a quick note.